INTRODUCTION
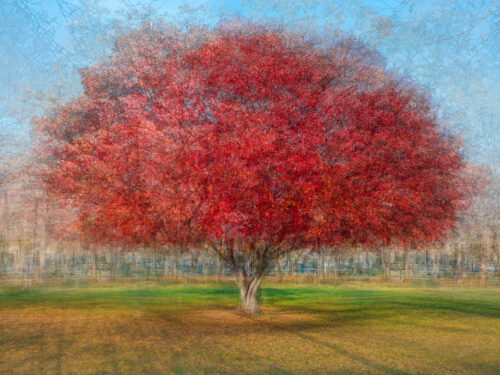
My latest photographs, have been taken with a particular type of ICM technique, called “in the round”. It is not the camera that is moved by the photographer but it is the photographer who moves around the subject with his camera, creating a series of ‘sharp’ images, which will then be merged with Photoshop. This technique of creating an impressionist-style image from a series of images surrounding a subject was originally devised by the Catalan artist Pep Ventosa, who describes it as “in the round”. His photographic collections of trees, among other subjects, inspired me to try this technique. The choice of the subject is the key to obtaining a good final result, as for any photographic genre. The ‘in the round’ photography, needs to choose a strong and isolated subject, clearly distinct in the colour and/or shape and/or luminosity against its surroundings. I initially chose the trees as the main subject of my “in the round” works. In some of these images, I also included a human element near the tree to try to tell a story. I also made works with trams, newspaper kiosks, children’s carousels, fountains, monuments, basketball players around the basket, flower kiosks, road roundabouts, flowers in a vase. Depending on how I choose the subject, the type of angle I shoot it from, the type of background and how I overlay the images in Photoshop, the results can be different: from foggy and slightly dreamlike, through impressionistic, to something almost surreal. In the final result the essence of the subject is maintained while the distracting elements of the background are dissolved. In short, the possibilities are endless.
CIRCUSTANCES, MATERIAL USED, SETTING, POST-PROCESS OF “THE RED TREE”
In the ‘in the round’ technique, I walk around the subject covering every part of the circle or just a part of it and taking photographs every few steps. In this way I collect 5-10-20 or more images, depending on the subject and context.
In my shootings I always pay attention that the main subject is always in the same position in the frame to make post-production work easier. The elements that maintain the same position in each shot will be easily recognizable when the images are blended. Elements that vary in position from shot to shot will appear unstructured. The more images are used, the more evident the effect will be.
No special photography equipment is needed. I work with my Canon 5D IV and usually with the 16-35 lens, always using the same focal length for shots. But I also tried this technique with the drone and with the smartphone, with pretty good results.
I took 9 photographs in the late afternoon to create the image “The red tree”, over an arc of 180°C, keeping the tree in a central position, having as a background other tree in the park and the houses of the city. All photos were taken in raw format, ISO 100, f5.6, 1/80-1/500, 29 mm, maintaining focus on the trunk. This tree is located in a park in a pretty town on Lake Maggiore (Angera) and in autumn its leaves are intensely coloured red-magenta.
Post-processing:
- I made basic adjustments in Camera Raw of all the images, correcting any highlights, and converted the raw files to jpg (easier to handle in Photoshop without having too big a file).
- I then opened the jpg files in Photoshop as layers.
- I chose the “base image” representative of the scene which will characterize the composition of the final photograph. This image was moved as the first layer down.
- On the base level, I created guidelines delimiting the height, width and centrality of the tree.
- I selected the other layers one by one and moved each layer to position the tree as much as possible within the guides. At this stage, I used the masks on each image to remove any unwanted elements that I did not want in the final photograph.
- I deselected all the layers, except the first one at the bottom, which should have 100% opacity.
- I selected the other layers one at a time and assigned each one a ‘correct’ opacity, depending on the desired final result. This opacity can vary from 5% to 60%, bearing in mind that the higher the opacity, the more detail will be displayed, while the lower the opacity the more blurred the image will be. For this image the opacity of different layers varies from 12 to 30%.
- You can use a different blending mode for each layer, depending on what you want to achieve. For this job, I used the ‘normal’ mode for all the layers.
- In this case I created a copy of the base image and placed it as a top layer and with the help of a mask I added further details on the leaves and trunk.
- When I have obtained the desired final image, I merged all the layers (I usually wait until the next day because, after a break, other changes surely come to mind and may need to be made).
- I cropped the image, as moving the layers causes imperfections along the edges. When shooting, bear in mind that a final crop will be necessary, so compose in such a way as to keep the branches of the tree quite far from the edges of the frame.
- I made the final adjustments in Photoshop/Camera Raw as for all other photographs: white balance, curves, levels, saturation, vignetting, sharpness.
See my portfolio: PAINTERLY-IMPRESSIONISTIC PHOTOGRAPHY – Fiorenzo Carozzi Photography
See my interview about this technique on 1x.com: The making of ‘The red tree’ by Fiorenzo Carozzi

